

When something goes wrong
Fixes for the problems people hit most, from a plan that won't upload to a quote that comes out as a draft.
Find the problem that matches what you're seeing, then follow its steps. Each fix ends with what you should see when it has worked.
What to watch for
- Most messages tell you exactly what to do. Read the message on the screen before you try anything else.
- Fix a wrong number at its source. A wrong quantity in Pricing usually comes from a measurement or a template formula, not from the rate.
- Many fixes need the Estimator, Site Admin, Org Admin or Super Admin role. If a button is missing, see "A button is missing, or my change was refused" in the Access and accounts part below.
- If nothing here fixes it, report it from inside the app. Select the bug icon in the top bar (its tooltip reads Send Feedback) or press Alt+Shift+B. Describe what happened, then select Submit report. You'll see Feedback sent — thank you! A screenshot of your screen is attached automatically.
Uploading and starting a job
My plan won't upload
TakeoffQS takes a PDF, or a single ZIP of PDFs, up to 500 MB. It checks each file before uploading it.
- Check the file ends in
.pdfor.zip. If you dropped another kind of file, you'll see Please upload a PDF file. - Check the size. A file over 500 MB shows PDF must be under 500 MB. If you used Select PDF File and nothing happened, the file is probably over 500 MB or isn't a PDF. Split the set and upload the parts as separate PDFs.
- If you see That file doesn't look like a valid PDF. or That file is not a valid PDF. Export or save as PDF, then upload again., export the drawing to PDF again from the program it came from.
- Upload a ZIP on its own. Adding a ZIP replaces any other files in the list. If you see That archive could not be read. Re-zip the plans and upload again., zip the PDFs again.
- If the PDF needs a password to open, save a copy without the password and upload that copy.
- If the file card shows an error under the file name, select Retry.
Success: the file card shows your file name and Uploading…, then the job form fills in.
A scanned plan still uploads. You may see This plan looks scanned — like a photo of a drawing. The job still processes, but detection is worse. Upload the designer's original PDF if you can get it.
Starting the job fails or shows an error
The message appears on the file card or in a bar at the bottom of the screen.
- There was a problem with your request (409). Please check the details and try again. The job has probably been started already, often because the same plans were uploaded before. Open Jobs and look for it before you upload again.
- This job is no longer available from this sign-in or organisation. Check you are in the right organisation before uploading the plan again. Select the organisation name in the top bar and check you're in the right one. Then select Change, then Select New File, and upload the plan again.
- Plan limit reached for this organisation. Your organisation has used its plan allowance. Ask your administrator to add more.
- This plan set could not be processed. Upload the plans again as a new file. Select Change, then Select New File. If the plans came in a ZIP, upload the PDFs directly instead.
- Extraction failed — please try again. Select Retry. This starts a fresh run.
Success: Begin Job (or Start this myself) shows Starting…, then the processing banner appears.
It says "Cannot create jobs here"
Your role in this organisation can't upload plans or start jobs. The Approver and Salesperson roles see this.
- If you belong to another organisation, select the organisation name in the top bar and switch to it.
- Otherwise, ask an Org Admin, Site Admin or Super Admin to change your role to Estimator.
Success: the Upload Plan card appears.
Measure opened but some sheets aren't ready
Measure opens as soon as the first sheet is ready. TakeoffQS keeps processing the rest in the background.
- Read the banner, for example Processing your plan — 4 of 12 pages ready.
- Work on the sheets that are ready. The banner disappears once every page is ready.
- If you see Still loading this page — try again in a moment., wait, then try again.
- If a sheet shows Wall detection could not be completed, select Retry wall detection.
- If a finished sheet has missing or poor detections, open the ⋯ menu on the canvas toolbar and select Redetect, then confirm with Redetect. This replaces the detected annotations on that sheet. Annotations you drew yourself are kept.
Success: the banner is gone and each sheet shows its detections.
Scale
The scale TakeoffQS picked is wrong
TakeoffQS reads the scale printed on the sheet, then checks it against the dimensions written on the drawing. If a measured length doesn't match its written dimension, TakeoffQS doesn't tick the scale and leaves it for you to check. It never changes the scale on its own. It can also misread the printed note, such as picking up a code reference or a number from the notes.
- In the right panel, open the Scale dropdown. If it offers Find on plan, select it to see where the scale was read.
- Pick the correct 1:N from the Scale dropdown.
- If it isn't listed, select Custom, type the number after 1:, then select Apply.
- If the sheet has no reliable scale, select Calibrate. Click both ends of a known dimension, enter it in Known dimension (mm), then select Apply Calibration.
- Check the result. Open Draw tools, select Ruler, and measure a printed dimension.
Success: a green tick shows beside Scale, and the ruler matches the printed dimension. Full steps: Verifying the takeoff.
It says no scale detected, or Not to Scale
You'll see one of these in the footer:
- No scale detected on this sheet. Pick one in the scale panel, or calibrate from a known dimension.
- This sheet is marked not to scale. Use Calibrate in the scale panel to measure it anyway.
- If the sheet states a scale, pick it from the Scale dropdown.
- If it doesn't, select Calibrate and calibrate from a dimension you're sure of.
Success: a green tick shows beside Scale and Next is no longer greyed out. Calibrate a not-to-scale sheet only if you trust the dimension you use.
I found the scale was wrong after I'd moved on
Go back and fix it. Changing a sheet's scale recalculates every measurement on that sheet. Wall heights changed on a cross-section also update the other sheets that use them.
- Open the sheet in Measure and correct the scale as above.
- Check that sheet's measurements in the right panel.
- Open Materials. Quantities update when someone who can edit the job opens Materials or Pricing.
- Open Pricing and check the totals before you send anything.
Success: the new measurements show on the sheet. If Materials shows Quantities not yet recalculated, someone who can edit the job needs to open it. If you see Couldn't update prices, select Retry.
Fixing the takeoff
The takeoff missed a door, window, cladding area, soffit or gable end
TakeoffQS only draws what it recognises on each sheet. Add anything it missed on the step that owns that item.
- Open the step that owns the item, for example Elevation → Windows or Roof → Soffit.
- Select Add followed by the item name on the canvas toolbar, for example Add Window. If the step measures more than one type, select Add and then pick the type.
- Draw the item. See Drawing and editing annotations.
- Select Done Adding followed by the item name.
Success: the item appears on the plan and in the right panel's measurements list.
Something is labelled as the wrong thing
You can change the type of a door on a floor plan. For anything else, delete the annotation and redraw it on the right step.
To change a floor-plan door's type:
- Open Framing → Doors.
- Select the door.
- On the door's card in the right panel, open the type dropdown. It shows the door's current type.
- Pick Internal Door, External Door, Slider, External Slider, Garage Door or Dummy Door. Use Dummy Door for a doorway with no real door.
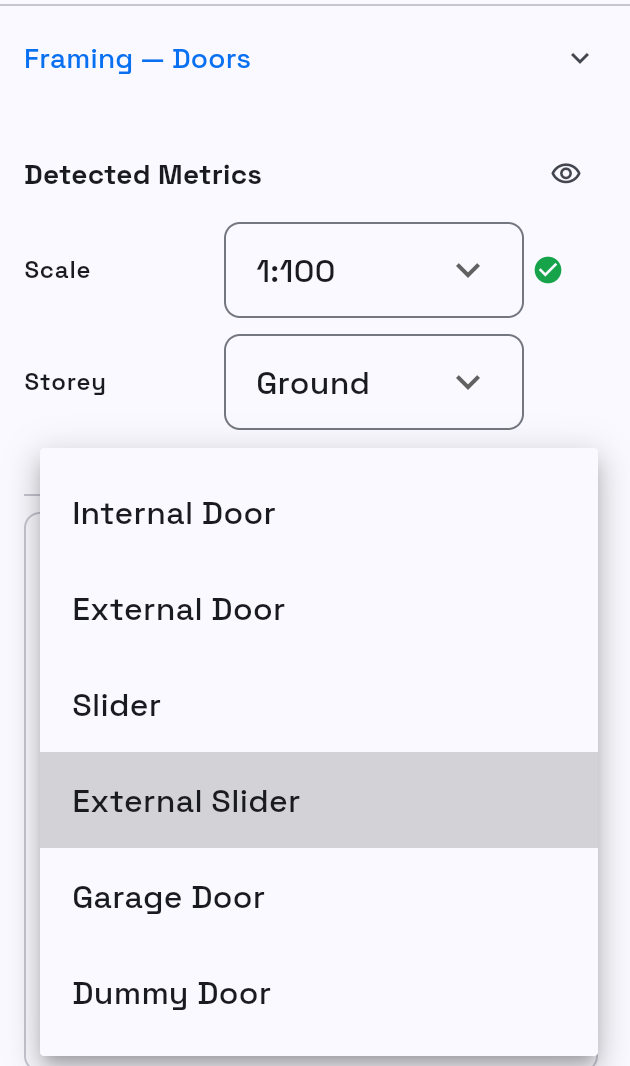
Success: the card moves under its new type and the label on the plan updates.
For anything else, such as a window detected as a door on an elevation, delete it (see the next problem), then add it on the correct step. If a cladding area has the wrong material, put it in the right group with Group cladding.
Something was detected that isn't there, or was detected twice
- Select the annotation on the plan.
- Press Delete, or select the bin icon on its card.
- In Delete annotation?, select Delete.
Success: the annotation and its measurements disappear.
To remove several at once, hold Shift and drag a box around them, then select Delete in the bar that appears. This one doesn't ask you to confirm. Undo (Ctrl Z) brings deleted annotations back. If one item has been split into pieces, select Merge instead.
A shape is the wrong size
Drag a corner, an edge or the whole shape until it matches the drawing. See Drawing and editing annotations.
Success: the measurements in the right panel recalculate.
Wet areas are wrong
Wet or dry is set on each internal wall. A wall takes its value from the room it belongs to, or TakeoffQS works it out. You can override either.
- Open Framing → Internal Walls.
- Select the wall.
- Read the wet/dry line on its card, for example Wet — from room (Bathroom) or Dry — inferred.
- Select Override to flip it. On a wall with no room, turn Wet (this wall) on or off instead.
- To remove an override, select Use room value.
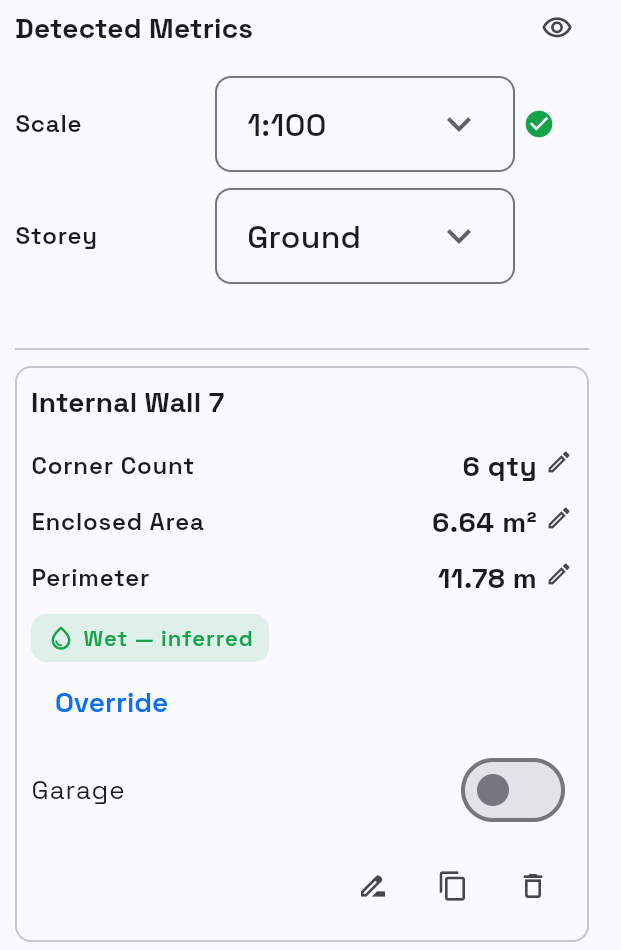
Success: the card shows Wet — override or Dry — override. The right panel lists each override, with Show wall beside it.
Hidden cladding looks wrong or keeps coming back
Some walls have cladding that no elevation shows. TakeoffQS works out those runs from the plan and draws them as boxes on the elevations. Each box's height is the job's wall height, or 2.4 m if no wall height has been measured. The Hidden Cladding step comes up once for each elevation sheet, and Next stays greyed out with Group all cladding first until every box on that sheet is in a cladding group.
- Open Elevation → Hidden Cladding.
- Select Pop out. The framing plan opens with the hidden runs highlighted, so you can compare them with the boxes.
- If every box is too tall or too short, fix the wall height in Cross Section → Wall Heights, then select Refresh hidden cladding in the Hidden cladding card.
- Resize any single box that's wrong.
- Delete any box that isn't cladding, either on the plan or with Delete hidden-cladding item in the card. A deleted box isn't proposed again. It's listed under Removed, with Restore to bring it back.
- Group the remaining boxes with Group cladding.
Success: Next becomes active, and the card lists each box under its group.
Next is greyed out
The footer shows what the step still needs. Do what the message asks.
- Confirm the page scale before continuing. Select Confirm & Continue, or pick the scale from Scale.
- No scale detected on this sheet… or This sheet is marked not to scale… See the Scale problems above.
- Add a Wall Height Draw a wall height on Cross Section → Wall Heights.
- Fill in this step. Fill in the step's details. If the job has none of this item, select Skip & Continue or Skip followed by the step name.
- Enter a value to continue Type the value the step asks for.
- Group all cladding first Put every cladding area in a group with Group cladding.
- Put each outline in a block Use Assign block.
- Draw the roof outline or Add the catchments Select the button with the same name. It opens that roof step.
- Finish the remaining measure steps before continuing to Materials. See the next problem.
If Previous is greyed out with This is the first measure step., there's nothing to fix.
I can't get from Measure to Materials
You can only leave Measure from the last step once every required step is done. Until then, the footer shows Finish the remaining measure steps before continuing to Materials. and a Finish button that names a step, for example Finish Wall Heights.
- Select the Finish button. It opens the first step that isn't finished.
- Complete that step. If it offers Skip & Continue and the job has none of that item, select it instead.
- Repeat until Next on the last step is active.
- Select Next, then Yes in Continue to Materials?. On some jobs the button reads Continue to Pricing instead.
Success: the breadcrumb moves to Materials (or Pricing).
My keyboard shortcuts don't work
Shortcuts pause while you're typing in a box or a dialog is open. Click the plan, then try again. Your account may also use different keys from the defaults.
- Open More (⋯) on the canvas toolbar and select Shortcuts.
- Check the keys listed in Keyboard Shortcuts.
Success: the key listed beside the action works on the plan.
Materials, pricing and quotes
Materials says Needs price, or "N to enter"
Needs price marks items under Materials found on plan that were spotted on the drawings but aren't in your pricebook. N to enter at the bottom of Materials counts template lines with no formula, so someone has to type their quantity.
To price a Needs price item (needs Site Admin, Org Admin or Super Admin):
- On the item, select + Add….
- Select Add to pricebook.
- Fill in the price details, then select Add.
Success: the item shows Priced. If your role can't add prices, ask an administrator, or see Importing a price list.
To fill in a to enter line:
- Find a line marked Enter quantity and select it to expand it.
- Type the amount in Quantity, then press Enter. To calculate it instead, select Use a formula.
Success: the to enter count at the bottom goes down by one.
A quantity in Materials or Pricing looks wrong
The quantity comes from three things: the measurement, the template formula and the project inputs. Check them in that order. Don't fix it by changing the rate.
- Expand the line in Materials. If it says Measurement not taken, or the geometry is wrong, select Go to Measure and correct it there.
- If the measurement is right, check the formula. In Pricing, select Edit formula (the Σ icon) on the line.
- In Pricing, select Project Inputs. Check every value, especially any marked Auto-suggested — verify, then select Save & Recompute.
Success: you'll see Inputs saved — recomputed N lines and the quantity updates.
Save & Recompute overwrites quantities you edited by hand on formula lines (they show EDITED). Changing the template does the same to the whole job: Applying replaces the current materials with this template.
Generate Quote is missing, or my quote came out as a draft
Generate Quote and Quotes are hidden if your role can't generate quotes, or if the job's latest quote has been accepted. A quote is saved as a draft while the job still has unfinished takeoff steps.
- Check your role. See "A button is missing, or my change was refused" in the Access and accounts part below.
- If the latest quote was accepted, open the quote list (left-rail Quotes, if your organisation has it), open the quote's menu and select Clone.
- If you saw Quote {number} generated as a draft — the project still has unresolved pricing items, go back to Measure and finish the steps named in the notice that starts Pricing is open.
- Select Generate Quote again. When asked Create a new revision?, select Create revision.
Success: you'll see Quote {number} generated with no draft warning. A draft quote can't be marked as sent.
My export didn't download, or it says warnings
A clean export often finishes with no message, so check your browser's downloads first.
- If you see Exported with N warnings, open the file and check it. The file has still downloaded.
- If you see a message starting Export failed, select Export again.
- If Elemental cost plan is missing from the chooser, it isn't turned on for your organisation. Cost Plan on the title bar only appears on concept drawings jobs.
Success: the file is in your downloads. See Exporting.
I can't find a job
- On Jobs, type in Search jobs by name, file, or notes….
- Select Filters. If your organisation uses the Desk, choose All Jobs, because My Queue only shows jobs assigned to you. Set the due date to Any due date, then select Filter.
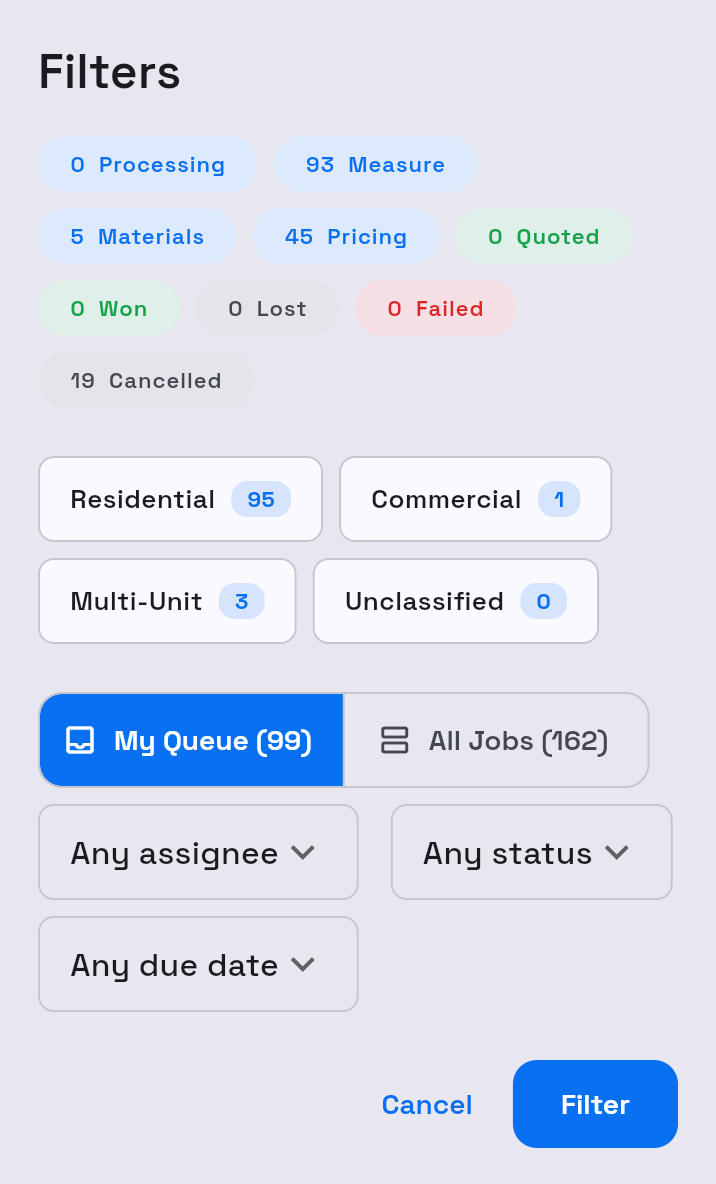
3. If a Needs attention chip is selected, select it again to clear it.
4. Select Clear Filters if it shows.
Success: the job appears. A deleted job can't be recovered.
Access and accounts
A button is missing, or my change was refused
The app hides controls your role can't use. If you try anyway, you'll see Your role in this organisation does not allow this. Switch organisation if you belong to another, or ask an administrator for access.
| Task | Roles |
|---|---|
| Start jobs, upload plans, fix the takeoff | Estimator, Site Admin, Org Admin, Super Admin |
| Edit a job's BoQ, apply a template, generate quotes | Estimator, Approver, Site Admin, Org Admin, Super Admin |
| Change the Vault or organisation templates | Site Admin, Org Admin, Super Admin |
| Invite members, change roles, change organisation settings | Site Admin, Org Admin, Super Admin |
| Assign or delete jobs | Site Admin, Org Admin, Super Admin |
- Ask an Org Admin to change your role.
- They open Account, select the Profile tab, then change your role under Members.
Success: the button appears. See Organisation roles — what each one can do.
I'm waiting for my account to be approved
TakeoffQS checks every new company account by hand.
- On Your account is awaiting approval, select Check again.
Success: TakeoffQS opens. If you see Still awaiting approval — nothing has changed yet., try again later or email support@takeoffqs.com.
My team member didn't get their invite
Invitation links expire after 7 days.
- Open Account, select the Profile tab, then open Members.
- Under Pending invitations, select Resend.
- If the row says Bounced — the invite email didn't arrive, select Copy link and send the link another way.
Success: you'll see Invite re-sent.
If the invitee sees This invite is for a different account, they need to select Sign out and sign in with the email address the invite went to. If they see This invite can't be used, send it again. Revoke cancels an invite straight away, with no confirmation.
I'm in the wrong organisation
The organisation name sits in the top bar. It only opens a list if you belong to more than one organisation.
- Select the organisation name.
- Choose the right entry. Each one shows Organisation (Role).
Success: TakeoffQS returns to Home in that organisation.
Vault
My price list import is stuck, or I lost it
- On Duplicates, Next stays unavailable while you see N duplicates still need a decision. Select Override or Skip on each row, or use Replace all or Keep all.
- Don't close the wizard while it shows "Analyzing". Closing it discards the analysis.
- Closing the wizard discards the import. Cancel asks Cancel import? first. Select Keep editing to carry on.
- If an import was discarded, upload the file again. Accepted files are CSV, TSV, XLSX, XLSM or PDF, up to 32 MB.
Success: you'll see "Import complete". See Importing a price list.